Quantcast
Channel: Ephesoft Docs
Viewing all 478 articles
Browse latest View live

Database Design Schema 3.x

$
0
0

Detailed Database Design Schema

Schema1-1

Schema1-2

Schema1-3

Schema1-4


Schema2-1

Schema2-2

Schema2-4


Schema3

Physical Data Model

  • ADVANCED_KV_EXTRACTION

ADVANCED_KV_EXTRACTION


  • APPLICATION_CHECKLIST

APPLICATION_CHECKLIST


  • BATCH_CLASS

BATCH_CLASS


  • BATCH_CLASS_CLOUD_CONFIG

BATCH_CLASS_CLOUD_CONFIG

  • BATCH_CLASS_CMIS_CONFIGURATION

BATCH_CLASS_CMIS_CONFIGURATION

  • BATCH_CLASS_DYNAMIC_PLUGIN_CONFIG

BATCH_CLASS_DYNAMIC_PLUGIN_CONFIG

  • BATCH_CLASS_EMAIL_CONFIGURATION

BATCH_CLASS_EMAIL_CONFIGURATION

  • BATCH_CLASS_FIELD

BATCH_CLASS_FIELD

  • BATCH_CLASS_GROUPS

BATCH_CLASS_GROUPS

  • BATCH_CLASS_MODULE

BATCH_CLASS_MODULE

  • BATCH_CLASS_MODULE_CONFIG

BATCH_CLASS_MODULE_CONFIG

  • BATCH_CLASS_PLUGIN

BATCH_CLASS_PLUGIN

  • BATCH_CLASS_PLUGIN_CONFIG

BATCH_CLASS_PLUGIN_CONFIG

  • BATCH_CLASS_SCANNER_CONFIGURATION

BATCH_CLASS_SCANNER_CONFIGURATION

  • BATCH_INSTANCE

BATCH_INSTANCE

  • BATCH_INSTANCE_GROUPS

BATCH_INSTANCE_GROUPS

  • DLF

DLF

  • DOCUMENT_TYPE

DOCUMENT_TYPE

  • EMAIL_DATA

EMAIL_DATA

  • FIELD_TYPE

FIELD_TYPE

  • FUNCTION_KEY

FUNCTION_KEY

  • HIST_MANUAL_STEPS_IN_WORKFLOW

HIST_MANUAL_STEPS_IN_WORKFLOW

  • JBPM4_DEPLOYMENT

JBMP4_DEPLOYMENT

  • JBPM4_DEPLOYPROP

JBMP4_DEPLOYPROP

  • JBPM4_EXECUTION

JBPM4_EXECUTION

  • JBPM4_HIST_ACTINST

JBPM4_HIST_ACTINST

  • JBPM4_HIST_DETAIL

JBPM_HIST_DETAIL

  • JBPM4_HIST_PROCINST

JBPM4_HIST_PROCINST

  • JBPM4_HIST_TASK

JBPM4_HIST_TASK

  • JBPM4_HIST_VAR

JBPM4_HIST_VAR

  • JBPM4_JOB

JBPM4_JOB

  • JBPM4_LOB

JBPM4_LOB

  • JBPM4_PARTICIPATION

JBPM4_PARTICIPATION

  • JBPM4_PROPERTY

JBPM4_PROPERTY

  • JBPM4_SWIMLANE

JBPM4_SWIMLANE

  • JBPM4_TASK

JBPM4_TASK

  • JBPM4_VARIABLE

JBPM4_VARIABLE

  • KV_EXTRACTION

KV_EXTRACTION

  • KV_PAGE_PROCESS

KV_PAGE_PROCESS

  • MODULE

MODULE

  • MODULE_CONFIG

MODULE_CONFIG

  • MODULE_PLUGIN

MODULE_PLUGIN

  • PAGE_TYPE

PAGE_TYPE

  • PLUGIN

PLUGIN

  • PLUGIN_CONFIG

PLUGIN_CONFIG

  • PLUGIN_CONFIG_SAMPLE_VALUE

PLUGIN_CONFIG_SAMPLE_VALUE

  • PLUGIN_DEPENDENCY

PLUGIN_DEPENDENCY

  • REGEX_VALIDATION

REGEX_VALIDATION

  • REMOTE_BATCH_INSTANCE

REMOTE_BATCH_INSTANCE

  • ROLE

ROLE

  • SCANNER_MASTER_CONFIG_SAMPLE_VALUE

SCANNER_MASTER_CONFIG_SAMPLE_VALUE

  • SCANNER_MASTER_CONFIGURATION

SCANNER_MASTER_CONFIGURATION

  • SEARCH_FINDER

SEARCH_FINDER

  • SERVER_REGISTRY

SERVER_REGISTRY

  • TABLE_COLUMNS_INFO

TABLE_COLUMNS_INFO

  • TABLE_INFO

TABLE_INFO

  • TABLE_INFO

TABLE_INFO

  • US_INVOICE

US_INVOICE

  • US_INVOICE_DATA

US_INVOICE_DATA

  • USER_INFORMATION

USER_INFORMATION

  • VENDORS

VENDORS

  • VFBVALIDATION

VFBVALIDATION


How to Recover MariaDB

$
0
0

How to Page?


Topic #9016 : How to Recover MariaDB

Applicable Ephesoft versions: 4020 and up


Instructions:

1. Open the my.ini file in the dependencies\mariadb folder

4030 RC1 Windows-2015-06-03-07-40-07

2. Add this option right below the port value:
innodb_force_recovery=1
(This change should be made under the [mysqld] section of the my.ini file, and not the [client] section of the my.ini file.)

4030 RC1 Windows-2015-06-03-07-41-39

3. Save the my.ini file

4. start the maria DB service.

5. Once mariaDB service has started check the DB with a db client(included in with ephesoft is hedi/sql)
and ensure that you are able to login.

6. Once you confirm the ability to connect to the db open up the my.ini file and remove the added line.

7. Now start up the ephesoft service


KB0008528: Font substitution in Ghostscript

$
0
0

KB Articles

KB Article #8528


Topic/Category: GhostScript Font Substitution.


Issue: Ephesoft is not reading a PDF correctly and the fonts appear to be different in the original PDF and the document in Review or validate.


Root Cause: When Ghostscript converts a PDF to single page tif files during the folder import, Ghostscript converts the fonts to a more readable font. Some fonts are not supported out of the box for Ghostscript such as Lucida and are therefor substituted with a different font such as Helvetica.


Solution:


Instructions: The font for the document will have to be added to the Ghostscript font library manually.

  1. Open the following file in notepad: C:\Ephesoft\Application\native\RecostarPlugin\bin\GsRenderer\Fontmap.GS
  2. The standard entries for this file have the name of the original font for the document and then the name of the font to which it should be converted. If a font does not exist in the ghostscript directory
    /TimesNewRoman                          /TimesNewRomanPSMT ;
    /TimesNewRoman,Bold                  /TimesNewRomanPS-BoldMT ;
    /TimesNewRoman,Italic                  /TimesNewRomanPS-ItalicMT ;
    /TimesNewRoman,BoldItalic           /TimesNewRomanPS-BoldItalicMT ;
  3. At the bottom of the file, you will want to create a new entry for your font and with the font to which you would like it converted. In this example, I am using LucidaSansBold as the original font and I am converting to a the windows true type font l_10646
    /LucidaSans,Bold (C:/Windows/Fonts/l_10646.ttf) ;
    /Dialog (C:/Windows/Fonts/l_10646.ttf) ;
  4. Save the Fontmap.GS file and restart Ephesoft

KB0009045: Migrate data from Oracle DB to SQL server

$
0
0

KB Articles


KB Article #9045


Topic/Category: Migrate data from Oracle DB to SQL server or MariaDB


Issue: You have data in an Oracle Database that you would like migrated to an MSSQL Database


Solution:

Migrate data from Oracle DB to MSSQL 


  • Approach 1: If data type at both the ends are same or compatible.

One can use SQL Server Feature of Linked Servers.

For example:-

INSERT INTO dbo.SQLTable1

SELECT * FROM OPENQUERY(ORALINKEDSERV, ‘SELECT * FROM OracleTable1’)

A SQL Procedure can be written using this approach.

For creating linked servers one can follow links here and here.


  • Approach 2: Using tool “Microsoft SQL Server Migration Assistant (SSMA)”

The compete migration steps using SSMA have been explained here.

Using this tool one can migrate any data from oracle to sql server.


Migrate data from Oracle DB to MariaDB

One can use MySQL Workbench to migrate most of the db objects and data to MariaDB.

Refer following link Using the MySQL Workbench Migration Wizard for details.


< Back|KB Main Page

KB0009078: Incorrect SSL certificate break Email Import

$
0
0

KB Articles


KB Article #9078

Applies to:  All Ephesoft Versions

Topic/Category: Incorrect SSL certificate break Email Import

Issue: Ephesoft Email Import fails to work and the logs suggest an issue with the SSL certificate

Root Cause: The problem being faced by the customer was due to mismatch in certificates installed on Email server and Ephesoft server.

Solution:

  1. Unzip the downloaded file “portecle-1.7.zip” to a folder. File can be downloaded here.
  2. Make sure you have Java SE 6 or later installed on your computer.
  3. Start a command line window and run the following command to start Portecle 1.7:
    java -jar \local\portecle-1.7\portecle.jar 

    Please refer following snapshot :
    image006
    Figure: Opening Portecle utility.
  4. Executing the command will open a UI application for you, where user can Open CA certs keystroke file :
    image007
    Figure: Opening keystore file
  5. User will be prompted for password, default password for cacerts (default Java keystore) is changeit
  6. It will display all the CA certs keystore’s alias name with last modified time. Clicking alias will display the details of the certificate :
    image008
    Figure: Certificate alias details
  7. User can also install a certificate using this simple utility. But user will have to open the keystore file in which certificate is to be installed. In this case user can add certificate to JAVA SDK’s and JAVA JRE’s default keystore. Default JAVA SDK’s and JAVA JRE’s keystore is a file named cacerts located inside %JAVA_HOME%/jre/lib/security.
  8. User should open the keystore file as explained above.
  9. To install the certificate user must navigate to Tools->Import Trusted Certificate as shown in figure:
    image009
    image010
    Figure: Importing the certificate into keystore.
    Navigate to the path were certificate to be installed is present and import the certificate.
  10. Similarly if user wants to check certificate installed on the web site or email server, it can easily be done with this tool. User can navigate to Examine->Examine SSL/TLS connection.
    image011
    Figure: Examining certificate of SSL/TLS connection
  11. User can enter the URL and port of server whose certificate is to be examined. e.g.
    image012
    Figure: Examining certificate of SSL/TLS connection
    image013
    Figure: Certificate for google.comBy comparing the certificate installed in cacerts keystore and certificate installed on Email Server (using above explained method) we were able to figure out that wrong certificate was installed inside cacerts keystore of Java being used by Ephesoft.


< Back|KB Main Page

KB0009077: Form Design: What’s the best fonts and sizes to use?

$
0
0

KB Articles


KB Article #9077

Topic/Category: Form Design

Question: Which are the best fonts for OCR in Ephesoft?

Answer:

Recommended Font Size: Font sizes 10 and above usually works best. If fonts are smaller than 10, we recommend capture of at least 300 dpi. We have seen capturing of size 6 fonts at this level, but it is always best to capture at ideal conditions.

Recommended Font Type: We have found Arial and Courier work best as the distance between each character is the same.


< Back|KB Main Page

Known Issue: Cannot Learn Fuzzy DB in 4.0.2.x

$
0
0

Known Issues Articles


Known Issue#:9075

Topic/Category: FuzzyDB

Ephesoft version(s) Affected: 4.0.2.x

Issue: FuzzyDB could not be learned.

Root Cause: This issue was caused by previous DocumentTypes having been previously configured with mapped index fields.
When the mapping for FuzzyDB was removed from these fields the selection of the RowID was still in place.
This caused the failure to learn the database on doctypes that were reconfigured and mapped using the fuzzydb configuration.

Solution:

Workaround:
Map at least one index field in the fuzzydb configuration so you can learn the db.  You can possibly use a dummy field that is hidden in the UI to accomplish this without impacting regular KV extraction.

Action Items:
A feature request has been added so that the RowID can be removed or cleared in the FuzzyDB configuration under the DocumentTypes. No version of fix has been assigned to the roadmap yet.


< BackKnown Issues Main PageNext Known Issue #? >

Upgrade ERROR for v3.1.1.0 – License Server Not Responding

$
0
0

Known Issues Articles


Known Issue: Upgrade ERROR for v3.1.1.0 – License Server Not Responding

Topic/Category: Licensing

Ephesoft version(s) Affected: 3.1.1.0

Issue: 

After an upgrade to v3.1.1.0 you may receive an error where the Ephesoft license server has failed to start. You will not be able to login to Ephesoft or Run any batches.

Sample ERROR log:

 3.1.1.0 2014-06-05 14:44:10,656 INFO  main com.ephesoft.license.client.LicenseClient - Object connection failed: Switching License service to    
 another License server
 java.rmi.ConnectException: Service object is null as the license server of this client is not up or resposnding.
   at com.ephesoft.license.client.LicenseClient.verifyLicense(Unknown Source)
   at com.ephesoft.license.client.LicenseClient.verifyLicense(Unknown Source)
   at com.ephesoft.license.client.LicenseClient.getCpuCount(Unknown Source)
   at com.ephesoft.license.aspect.LicenseAspect.fetchAvailableCount(Unknown Source)
   at com.ephesoft.dcma.core.common.EphesoftLicenseAspectUtil.getAllowedCpuCount(EphesoftLicenseAspectUtil.java:47)
   at com.ephesoft.dcma.core.threadpool.ThreadPool.getAvailableCpuCount(ThreadPool.java:468)
   at com.ephesoft.dcma.core.threadpool.ThreadPool.getCorePoolSize(ThreadPool.java:195)
   at com.ephesoft.dcma.core.threadpool.ThreadPool.<init>(ThreadPool.java:139)
   at com.ephesoft.dcma.core.threadpool.ThreadPool.getInstance(ThreadPool.java:350)
   at com.ephesoft.dcma.twain.UploadServlet.<init>(UploadServlet.java:47)
   at sun.reflect.NativeConstructorAccessorImpl.newInstance0(Native Method)
   at sun.reflect.NativeConstructorAccessorImpl.newInstance(NativeConstructorAccessorImpl.java:57)
   at sun.reflect.DelegatingConstructorAccessorImpl.newInstance(DelegatingConstructorAccessorImpl.java:45)
   at java.lang.reflect.Constructor.newInstance(Constructor.java:525)
   at java.lang.Class.newInstance0(Class.java:372)
   at java.lang.Class.newInstance(Class.java:325)
   at org.apache.catalina.core.StandardWrapper.loadServlet(StandardWrapper.java:1116)
   at org.apache.catalina.core.StandardWrapper.load(StandardWrapper.java:993)
   at org.apache.catalina.core.StandardContext.loadOnStartup(StandardContext.java:4187)
   at org.apache.catalina.core.StandardContext.start(StandardContext.java:4496)
   at org.apache.catalina.core.ContainerBase.start(ContainerBase.java:1045)
   at org.apache.catalina.core.StandardHost.start(StandardHost.java:785)
   at org.apache.catalina.core.ContainerBase.start(ContainerBase.java:1045)
   at org.apache.catalina.core.StandardEngine.start(StandardEngine.java:443)
   at org.apache.catalina.core.StandardService.start(StandardService.java:519)
   at org.apache.catalina.core.StandardServer.start(StandardServer.java:710)
   at org.apache.catalina.startup.Catalina.start(Catalina.java:581)
   at sun.reflect.NativeMethodAccessorImpl.invoke0(Native Method)
   at sun.reflect.NativeMethodAccessorImpl.invoke(NativeMethodAccessorImpl.java:57)
   at sun.reflect.DelegatingMethodAccessorImpl.invoke(DelegatingMethodAccessorImpl.java:43)
   at java.lang.reflect.Method.invoke(Method.java:601)
   at org.apache.catalina.startup.Bootstrap.start(Bootstrap.java:289)
   at org.apache.catalina.startup.Bootstrap.main(Bootstrap.java:414)


Root Cause: Ehesoft is not compatible with IPv6

Solution:

Follow instructions from here: http://wiki.ephesoft.com/license-issue-with-ipv6

Updates:


< Back| Known Issues Main Page | Next Known Issue #? >


List of artifacts required for issues by area

$
0
0

Details: When escalating an issue with Ephesoft, support requires specific information. For each area of the application, there are different artifacts that are necessary for the investigation of the issue. Here is a list of artifacts that are required separated by the area of the application.


S No. Area Artifacts
1 Workflow/JBPM Slowness

DB Dump

All Logs All Servers

Application All Servers

2 Fuzzy DB

Fuzzy DB Dump

Batch Class

Batch Instance

Application

All Logs

Replication Steps

3 Review/Validate Screens

All Logs

Application

Batch Class

Batch Instance

Replication Steps if possible

Custom Jars if used in scripts

4 CMIS

All Logs

CMIS Server logs

CMIS Server connection RDP if other than alfresco

Batch Class

Batch Instance

Application

Replication Steps if possible

Custom Jar files if present in script

5 Web Scanner

All Logs

Application

Batch Class

Scanner Type

Drivers being used

Scanner not being used by various user using single credentials

6 Reporting

All Logs

Application

Batch Class

Reporting Folder in Shared Folders

Database Dump

Reporting DB Dump

7 Image/PDF Conversion

All Logs

Application

Native version (Recostar/Naunce)

Batch Class

Batch Instance

8 Email

All Logs

Application

EMAIL Attachment

Batch Class

Batch Instance

Server Type

Protocol Being used for connection

9 LDAP/ Active directory

All Logs

Application

Server.xml

Access to LDAP Directory if possible

10 Extraction

All Logs

Application

Batch Class

Batch Instance

11 Document Assembly

All Logs

Application

Batch Class

Batch Instance

How To Elevate To Admin without Prompting

$
0
0

How to Page?


Topic#9232  : Elevate To Admin without Prompting

Applicable Ephesoft versions: ALL

Due to changes in Default security settings from one version of Windows to another (e.g. Windows Server 2012 R2), a user account that is listed as a member of the Administrators group may not inherently perform any activity with the assumed Administrative rights. It may be necessary to change the following Local Group Policy:


Instructions:

“User Account Control: Behavior of the elevation prompt for Administrators in Admin Approval Mode” to “Elevate without Prompting”.

This enables admin privileges to members of the Local Administrators group by default, allowing the Local administrators to access, install and modify applications, files and settings on the local machine in Windows. This does not grant Domain Admins Rights to the user as the group policies only apply to the current server the user is listed on as a member of the Administrators group.

Instructions for changing the above mentioned Local Group Policy:

  1. In the windows Run command type “gpedit.msc”
  2. Navigate to the following Local Policy Computer Configuration -> Windows Settings ->Security Settings-> Local Policies-> Security Options
  3. Under the Security Options Select the following policy: “User Account Control: Behavior of the elevation prompt for Administrators in Admin Approval Mode”
  4. Right Click and Select Properties
  5. Click on the Drop Down Menu and Select “Elevate without Prompting”
  6. Click Ok and Restart your Server.

If this Local Group Policy is set before Ephesoft is installed then the installation will complete without issue.
Please Note: A restart will be required in order to apply this change.

Default Local Group Policy Settings for Windows Server 2012 R2:WinGPedit


< Back | How To Main Page| Next How To Article #? >

Batches Stuck

$
0
0

Description: At times, Batch Instances can sometimes appear stuck. While investigating these, there are a few common issues which can cause this. There is a list below of common Causes and Solutions of these issues.

S. No. Cause Workaround/Solution
1 Workflow not deployed/corrupted for batch class corresponding to which batches are running. Deploy the corresponding batch class from batch class management screen.
2

Inconsistent database state when changes made to Ephesoft database manually from outside while Ephesoft is running.

For example, deleting entries from JOB table when Ephesoft database is in use. This is totally wrong practice because manual changes in database does not get reflected to Ephesoft because changes were not made from Ephesoft’s session.

Manual changes in database must be avoided in general. Only in case of extreme emergency if any manual change to database has to be done, then it should only be done after stopping all the Ephesoft applications on cluster.
3 Jobs taking long time to execute due to large no of Jobs in ERROR state in JBPM4_JOB table. Clear out the erroneous entries from JBPM4_JOB table after stopping Ephesoft server.
4

Batches can get stuck in Running state if some command gets stuck for long duration of time. For example, Recostar commands may get stuck with some special images which it cannot handle.

Note: This has fixed in 3.1 release as command will automatically terminate as retry/timeout mechanism has been added for this purpose. It will kill the stuck command and will retry the command which is configurable from property file.

Manually kill the stuck command from task manager and try to re-execute by restarting the batch.
5

Batches stuck in RUNNING state due to long (external non java) processes executing in client scripts.

We have seen few occasion in custom client script where customer is using Java Process Executor to execute some external application (non-java). Usually in such script no error handling is in place which can lead to stuck or error process which might contribute to stuck batches.

Analyse the script and improve the custom code by putting exception handling in place.
6

Batches stuck in RUNNING state due to improper database connection management in client scripts.

We have seen few instances where customer creates a new DB connection every time when a method is called from script and same connection is not closed. This potentially is very dangerous as it may lead to database hung connections (extremely high load on DB due to numerous DB connections). Due to this DB may become unreachable for application and batches may get stuck waiting for DB.

In addition to this it can also lead to memory leak in application which could lead to server crashes.

Analyse client scripts for better database connection management. Make sure only required number of connections have been opened and all the connections are closed properly.
7 Database deadlock issues when MSSQL is used at the backend. Please make sure all the indexes are applied on the database as suggested on this Ephesoft wiki page.

Email Import full email address required to save

$
0
0

Known Issues Articles


Known Issue#: EPHE-9238

Topic/Category: Email Import

Ephesoft version(s) Affected: 4.0.2.0 – 4.0.2.1

Issue: When configuring Email Import in Ephesoft, if the username used to connect to your mail server does not require the fully qualified email address, Ephesoft will not allow you to save the settings. This is based on the required information for the email server. We have seen this when Microsoft Exchange is configured to allow usernames without the @sample.com extension.


In the example here, the username for the email import does not contain the @sample.com part of the email address and will not allow you to save your settings.(notice the red background on the text box)

EmailImport2


In order to save the email import details, the username must have the @sample.com after the username of the email address. See screenshot here:

EmailImport1


Root Cause: Change in the validation of the field in 4.0.2.0. This did not effect 3.1.X.X versions.

Solution:

Workaround:

Instructions

  1. Test the email import settings without the @sample.com(insert your domain instead of sample.com) by using the Test Email button.
  2. If this succeeds, enter the fully qualified email address in this field in order to save the settings
  3. Once the settings are saved, open the ephesoft database in HeidiSQL or your SQL client of choice (MS SQL studio, phpMyAdmin, DBeaver, MySQL)
  4. Navigate to the batch_class_email_configuration table
  5. Find the entry for the specific email import settings that you just saved, and remove the @sample.com domain extension and save the row.
    EmailImport5
  6. This should start the email import on the cron schedule that is configured.


< BackKnown Issues Main PageNext Known Issue #? >


KB0009018: Single Page TIF files are being imported out of order

$
0
0

KB Articles

KB Article #9018

Topic/Category: Page order in Document

Issue: When uploading a group of single page tif files, the files are not in the correct order when the files are numbered such as file1, file2, file3

Root Cause: When importing the files, if the user has numbered the files in order to guarantee their order, they will not be imported correctly if there are more than 10 files and a single digit is being used for the file numbering.

Solution:

Instructions

  1. In order to resolve this issue, the user must name the files with a buffer of zeros in the numbering of filenames. Instead of file1. the file should be named with the numbering schema of file0001 which will keep windows from ordering the as file1, file10, file2 and so forth. With this file numbering, the files will be imported in the correct order.


< Back|KB Main Page

KB0008914 – Batch Class will not import

$
0
0

KB Articles


KB Article #KB0008914

Topic/Category: Batch Class Import

Version: 4.0.2.1

Issue:

Batch classes not being imported with following error logs:

org.springframework.orm.hibernate3.HibernateObjectRetrievalFailureException: No row with the given identifier exists: [com.ephesoft.dcma.da.domain.DocumentType#502]; nested exception is org.hibernate.ObjectNotFoundException: No row with the given identifier exists: [com.ephesoft.dcma.da.domain.DocumentType#502]

Root Cause: It has been observed that when there is a fuzzy DB mapping for a document type, configured in a batch class that is imported, code searches for the document type ID that was being exported instead for generating new document type ID. If there is no document type with such ID in system, batch class import fails.

Solution: 

Optimizations have been made to generate new document type ID instead of searching for the one that was being exported.

File: Solution_BCImport.zip

Instructions:

  1. Stop Ephesoft server, if running.
  2. Delete following jar(s) from Ephesoft application lib directory at <Ephesoft-Installation-Directory>/Application/WEB-INF/lib/*:
    1. dcma-data-access*.jar
  3. Extract the attached solution (Solution_BCImport.zip) and copy following jar(s) at <Ephesoft-Installation-Directory>/Application/WEB-INF/lib/*:
    1. dcma-data-access-0.0.15_4021_25_May_2015.jar
  4. Start the Ephesoft server.


Permanent Fix?: Permanent fix.


< Back|KB Main Page

KB00009023 – Database Failover Error after upgrade to v3.1.2.6 or higher

$
0
0

Topic/Category: Logs

Applies to:

Ephesoft v3.1.2.6 to v3.1.2.12

Issue:

Database Failover Error after upgrade to v3.1.2.6 or higher

We are currently noticing ‘Database Failover is not running under this server.’ error occurring every minute in our multi-server environments (Load Test and production) after 3.1.2.6 upgrade.

Root Cause:
There is nothing to worry regarding on this error in the logs. This was just a log that should be in INFO level logs but coming in ERROR level. We will correct it in 3.1.2.13.

Solution: 

The database.server.failover.recovery switch in the dcma-workflows.propeties is meant to work with a specific version of MSSQL (MSSQL Server 2012 R2).
It enabled a special configuration allowing Ephesoft to take advantage of the New Failover option with MS SQL called “Always On”.

Since this is only available for MSSQL Server 2012, you do not need to have this switch enabled. (It is enabled by default in the 3.1.2.0+ installer).
It will not impact your processing with it on as it is simply looking for a DB server that it can communicate with. You can disable this switch any time on all your servers without impact of your current environment.

You customer can set the dcma.alwayson.cronjob.expression property to 0 0 0 * * ? 2020 such that the cron executes on year 2020 and then only the next error log will come.


< Back | Main Documentation Page|


Remove a Custom Plugin

$
0
0

Overview

This is a step by step guide to remove a custom plugin from Ephesoft.

Steps

  • Remove the custom plugin to be deleted from all the batch classes and deploy the workflow for each of the modified batch class. It is mandatory that the plugins be removed from all the batch classes.
  • After following the above step execute the following queries

1. use <Ephesoft DB Name>;

2. select id as PLUGIN_ID from plugin where plugin_name like ‘%PLUGIN_NAME%’;

  • From the PLUGIN_ID obtained from the above query execute the following query

1. delete from plugin_dependency where plugin_id = PLUGIN_ID;

  • Then execute the query

1. select id as PLUGIN_CONFIG_ID from plugin_config where plugin_id = PLUGIN_ID;

2. delete from plugin_config_sample_value where plugin_config_id = PLUGIN_CONFIG_ID;

3. delete from plugin_config where plugin_id = PLUGIN_ID;

  • Finally execute the query to eliminate plugin

1. delete from plugin where id = PLUGIN_ID;

  • Delete the plugin configurations from the application-Context.xml file in the Ephesoft Application Installed Directory

Sample <import resource=”classpath:/META-INF/applicationContext-XXX-plugin.xml”/>

  • Remove the custom plugin JAR from the {Ephesoft Installed Directory}\Application\WEB-INF\lib folder
  • Remove the added plugin configuration file from the {Ephesoft Installed Directory}\SharedFolders\workflows\plugins
  • Restart the Ephesoft server to reflect the changes.

How To Use Jvisualvm

$
0
0

Topic #9072 : How To Use Jvisualvm


Introduction to Java VisualVM

Java VisualVM is a tool that provides a visual interface for viewing detailed information about Java technology-based applications (Java applications) while they are running on a Java Virtual Machine (JVM). Java VisualVM organizes JVM data that is retrieved by the Java Development Kit (JDK) tools and presents the information in a way that enables you to quickly view data on multiple Java applications. You can view data on local applications and applications that are running on remote hosts. You can also capture data about the JVM software and save the data to your local system, and view the data later or share the data with others.

In order to benefit from all Java VisualVM’s features, you should run the Java Platform, Standard Edition (Java SE) version 6.


Java VisualVM is bundled with JDK version 6 update 7 or greater. Once you have installed an appropriate JDK version, navigate to your JDK software’s bin directory and double-click the Java VisualVM executable. On Windows this directory will be the following:

C:\Program Files\Java\jdk1.6.0_update-number\bin

Alternatively, navigate to your JDK software’s bin directory and type the following command at the command (shell) prompt:

jvisualvm

The first time that you launch Java VisualVM you are prompted to accept a license agreement.

Java VisualVM Userdir

On Windows, the default location for the Java VisualVM userdir is the following:

C:\Documents and Settings\<USER>\Application Data\.visualvm\JDK_update-number

To find the location of your Java VisualVM userdir, choose Help > About from the main menu and click Details in the About Java VisualVM window.

Java VisualVM Windows

When you start Java VisualVM, the main Java VisualVM window opens. The main Java VisualVM window is divided into two windows.

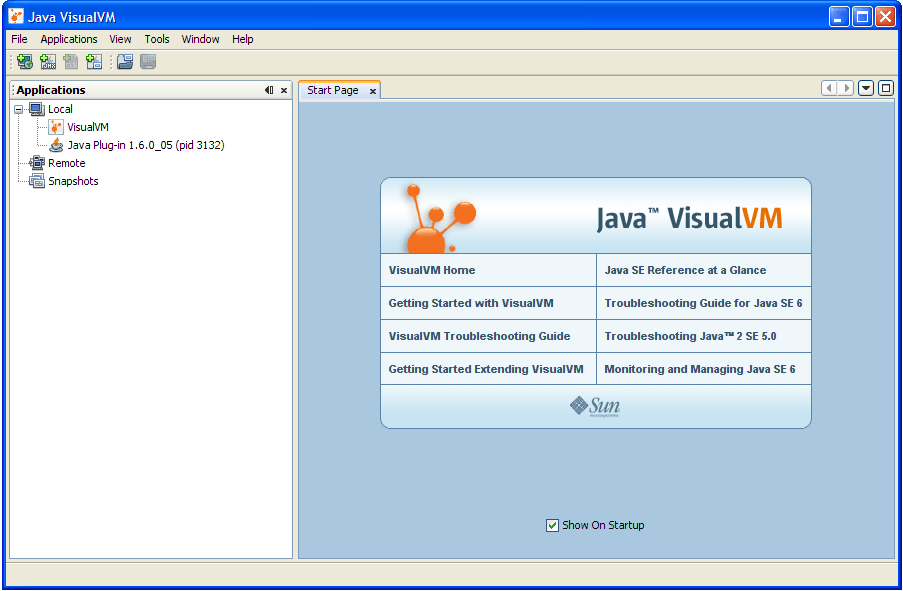
screenshot of VisualVM window with Start screen

When you first start Java VisualVM, the Applications window is visible in the left side of the window and the Start Page is visible in the right side in the main window. The Start Page contains links to Java VisualVM documentation web pages and additional resources.
Note: The Start Page opens by default each time you start Java VisualVM. You can open the Start Page at any time by choosing Help > Start Page from the main menu. You can also hide the Start page by unchecking the “Show On Startup” check-box.

Applications Window

The Applications window opens in the left side of the main Java VisualVM window when you launch the application. The Applications window is the main point of entry for exploring the details of running applications. The Applications window uses a tree structure to enable you to quickly view the applications running on the local machine and any connected remote machines. You can also access core dumps (Solaris/Linux) and saved snapshots from the Applications window.

Right-clicking a node in the Applications window opens a popup menu that enables you to perform actions related to that node, including opening application tabs, taking heap and thread dumps and opening snapshots in the main window.

For more details about how to use the Applications window to view and save data, see the following pages:

Main Window

Detailed information about applications is displayed in the main window. When you view data about an application, each application is represented by a tab in the main window that enables you to easily view and navigate the data. Saved thread dumps and heap dumps are also opened in the main window.

For information about the application data that can be displayed in the main window, see the following pages:

Java VisualVM Plugins

You can add functionality to Java VisualVM by using the Plugins manager to install plugins from the Java VisualVM Plugins Center. You can also extend the functionality of Java VisualVM by developing your own plugins that can then be added to an update center.

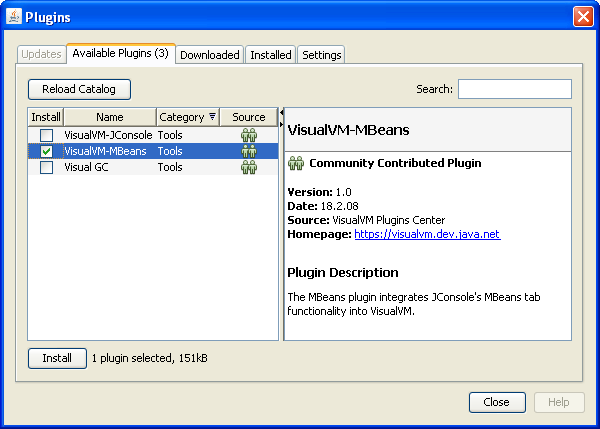
For example, installing the Java VisualVM-MBeans plugin adds an MBeans tab to the application tab that enables you to monitor and manage MBeans from within Java VisualVM.

To install a Java VisualVM plugin:

  1. Choose Tools > Plugins from the main menu.
  2. In the Available Plugins tab, select the Install checkbox for the plugin. Click Install.
  3. Step through and complete the plugin installer.

screenshot of Plugins window

For more information about creating Java VisualVM plugins, see the following documents:

Images are to be left indented


< Back | How To Main Page| Next How To Article #? >

Updates and Downloads – Ephesoft v3.1.2.12 for v3.1.2.x – Windows

$
0
0

The Latest Version of Ephesoft can be Downloaded here


RELEASE NOTES:

1 Feature Enhancement: Support for the latest Paper Stream driver v1.21.
2 Feature Enhancement: All the HTML files in Ephesoft now support HTML 5 complainant doctype.
3 Feature Enhancement: Upload process in Web Scanner has been optimized for speed.
4 Feature Enhancement: OutOfMemory Error has been resolved for Batches with large number of images (more than 1000 images).
5 Fix For Problem: Uploaded file names on Linux Environment are generated correctly when files are uploaded using Internet Explorer.
6 Fix For Problem: Learn DB now supports large number of Fuzzy DB mappings in batch class.
7 Fix For Problem: Scanned Images from Web Scanner and Uploaded Files from Upload Batch now gets uploaded in case username contains spaces.
8 Fix For Problem: Sync DB operation has been optimized for null values.

Unable to remove DB connection in v4.0.2.x

$
0
0

Known Issues Articles


Known Issue#9076: Unable to remove DB connection in v4.0.2.x

Topic/Category:DB connection

Ephesoft version(s) Affected:4020/4021

Issue: Unable to remove DB connection in v4.0.2.x

Root Cause:

This issue is caused due to a In Use or Lock Constraint. If a connection is currently used in a Doctype for FuzzyDB then this will prevent the deletion of the connection in the connection manager.

Since the connection you attempted to delete had been in use in a deleted batch class there was no way to disassociate it in the UI, causing the “Cannot Delete: Connection In Use” error you received in the UI.

Solution:

You can manually set the connection as deleted in the database using the “Connections” table. You do this by altering the table under the “is_deleted” column with a “1” for the corresponding connection name.

This will then propagate to the UI and the DB connection will be removed from the list.

Updates:

A feature request will be added so that the connections in the DB can be deleted no matter what or at least take into account if a connection is being used in a deleted batch class.


< Back| Known Issues Main Page | Next Known Issue #? >


How to use custom column feature ?

$
0
0

Topic:

Scripting

Ephesoft Versions:

v4.0+


Instructions:

User will need to write custom scripts to insert data in ‘custom_column(s)’ of ‘batch_instance’ table which will be shown on Batch Instance Management Grid.

The data can be fetched from Batch XML or any other data source.


Sample Code:

public void updateCustomValues(String... values) {


              Connection connection = null;

              Statement statement = null;

              try {

                     // STEP 1: Register JDBC driver(SQL SERVER IN THIS EXAMPLE)

                     Class.forName("net.sourceforge.jtds.jdbc.Driver");


                     // STEP 2: Open a connection

                     System.out.println("Connecting to a selected database...");

                     connection = DriverManager.getConnection("jdbc:jtds:sqlserver://localhost:1433;databaseName=ephesoft;sendStringParametersAsUnicode=false;prepareSQL=3", "root", "");

                     System.out.println("Connected database successfully...");


                     // STEP 3: Execute a query

                     System.out.println("Updating records into the table...");

                     statement = connection.createStatement();


                     String sql = "UPDATE batch_instance SET custom_column1= '" + values[0] + "' WHERE identifier='BI1'";

                     statement.executeUpdate(sql);


                     System.out.println("Records succssfully updated into the table...");


              } catch (SQLException sqlException) {

                     // Handle errors for JDBC

              } catch (Exception exception) {

                     // Handle errors for Class.forName

              } finally {

                     // finally block used to close resources

                     try {

                           if (statement != null)

                                  connection.close();

                     } catch (SQLException se) {

                     }// do nothing

                     try {

                           if (connection != null)

                                  connection.close();

                     } catch (SQLException se) {

                           se.printStackTrace();

                     }// end finally try

              }// end try

       }


< Back | Main Documentation Page|

Viewing all 478 articles
Browse latest View live


<script src="https://jsc.adskeeper.com/r/s/rssing.com.1596347.js" async> </script>